Homework 5
For our next assignement, we dove further into using ASP.NET MVC 5 setting up and accessing a database that utilized one table. Our goal was to create a form that could be viewed, submited, and then updated within our database. In addition, we would have functionality that would list out all of our entries on another page in a list view type format. Setting up a database was exciting as it allowed for us to modify specific pages once our resources were called via GET requests and display new information based on the actions taken by our users.
Links
Want to go back?
Database Construction (Creation and Connection)
The first task we had to accomplish was to set up the database. We start by creating a DB which could be linked to a different system or you can use a database feature called LocalDB. This is a seperate downloadable package provided by ASP.NET. I specifically used this feature as it made it convient for learning the basics. We then had to access and add a database item within the app_data folder. Once added, we had to walk through a series of steps to connect the information and add a specific path into our web.config file. Once set up, we can began the process of creating SQL commands and linking those commands to our database to begin setting up our tables and/or first entries as needed. Once specified, we then simply had to hit the execute button.
Example below of the SQL Sytax for Creating the Table and Inserting Items:

Example of Setting up the link in our Web_Config file:

Model Class and Database Context Class
Next we had to create classes that would be the foundation for accessing our database. Specifically I created a Tennant class that included all of the information needed for a tennent to fill out necessary information required for the form. Within the class, we were shown how to set required fields that would be enforced vs. within our HTML view page. This new process seemed more efficient as rules could be set and efforced as we were building the class. Subsequently these rules were easier to access and view all in one place.
Example fields of the Tennant Class:
public class Tennant
    {
        //tennant class to be used within the db and for get/post requests
        [Key]
        public int ID { get; set; }

        [Display(Name= "First Name:"), Required(ErrorMessage = "Name must be at least 3 characters long")]
        [StringLength(30, MinimumLength = 3)]
        public string FirstName { get; set; }

        [Display(Name = "Last Name:"), Required]
        [StringLength(30, MinimumLength = 3, ErrorMessage = "Name must be at least 3 characters long")]
        public string LastName { get; set; }

        [Display(Name = "Phone Number:"), Required]
        [RegularExpression("^[0-9]{3}-[0-9]{3}-[0-9]{4}$", ErrorMessage = "Enter Phone Number in the format of: 999-999-9999")]
        public string PhoneNumber { get; set; }
As you can see above, I was able to set restrictions on my class items such as the “phone number” field which I enforced using regular expressions. And I could set error messages in the case that the user was not entering the information in correctly. I was also able to set minimum and maximum lengths for specific fields as well as making them required as to avoid leaving out critical information.
In addition, we had to create the Database Context Class that would work to provide a list of Tennents or Tennant objects that would be viewed for a FormList page. This class was necessary so that when we returned a view back using a GET request, we could return a list object that would query the database providing an updated list based on whether we added or deleted an entry from the database.
Example of Database Context Class:
{   //class for creating a list of tennants using the db
    public class FormsContext : DbContext
    {
        public FormsContext() : base("name=FormData") { }

        public virtual DbSet<Tennant> Tennants  { get; set; }
    }

}
GET-POST-Redirect Pattern
To improve our ASP.NET skills we needed to learn how to redirect when specific actions were taken by the user. An example of this would be when a form is submitted by the user, what would be displayed to them next. Or if the user doesn’t complete the form, how do we redirect them to make sure that their current data isn’t lost. The answer is called GET-POST-Redirect Pattern that basically functions just as described above. As users perform specific actions, we redirect the user accordingly based on the functionality that we have set up within our controller. An example of this is listed below:
Example of GET-POST-Redirect:
        [HttpPost]
        [ValidateAntiForgeryToken]
        public ActionResult Create([Bind(Include = "ID,FirstName,LastName,PhoneNumber,ApartmentName,UnitNumber,TextBox,CheckBox,VerifiedDate")] Tennant tennant)
        {
            //if form has been completed correctly and submitted
            if (ModelState.IsValid)
            {
                //access db and insert/stage new tennant data
                db.Tennants.Add(tennant);
                //save the db
                db.SaveChanges();
                //get request to take the user to the formlist view
                return RedirectToAction("FormsList");
            }
            //if form was not filled out correctly, return to the create page keeping current data
            return View(tennant);
In this example, if the ModelState is valid (basically if the class information has been completed as required by the class), then we access the database, stage the new entry for saving the new information, then save the entry back to the database. From there we can return the user to a new view, or any view of our chosing. In my case, I simply redirect the user to the list of forms in the “return RedirectToAction(“FormsList”)” action. If the user has not completed the required fields, instead I return them back to a bound view that simply keeps them on the create page and retains the data already entered by the user thus far using Strongly Typed Views (listed below). This makes it to where the user is not forced to start over if they don’t complete the form in it’s entirety.
Strongly Typed Views
This is where the magic of the above happens where we maintain the data that the user has provided and return this view back to the user without losing their entry information. We use “Strongly Typed Views” that work to provide this information back to the user as it is being entered. Using Razor code, I created the UI in HTML format that would show the user the updated view based on user entered information so far, then returning the view back to the user as they progressed through the remainder of the form.
Example of Strongly Typed Views:
@model Homework5.Models.Tennant

@{
    ViewBag.Title = "Create";
}

<h2 class="form_title">Campus Apartments</h2>
<br />
<h4 class="form_title">Tennant Request Form</h4>
<br />
@*Form information used for the create get/post requests*@
@using (Html.BeginForm())
{
    @Html.AntiForgeryToken()
    <hr />
    @Html.ValidationSummary(true, "", new { @class = "text-danger" })
    <div class="form-group">
        <div class="row">
            <div class="col-sm-4">
                @Html.LabelFor(model => model.FirstName, htmlAttributes: new { @class = "control-label col-md-2" })
                @Html.EditorFor(model => model.FirstName, new { htmlAttributes = new { @class = "form-control" } })
                @Html.ValidationMessageFor(model => model.FirstName, "", new { @class = "text-danger" })
            </div>
Lambda functions are used to return information that is being provided back to the user through a GET request in the event that they do not input all of the information as required.
Demo of Working Site/Final Product
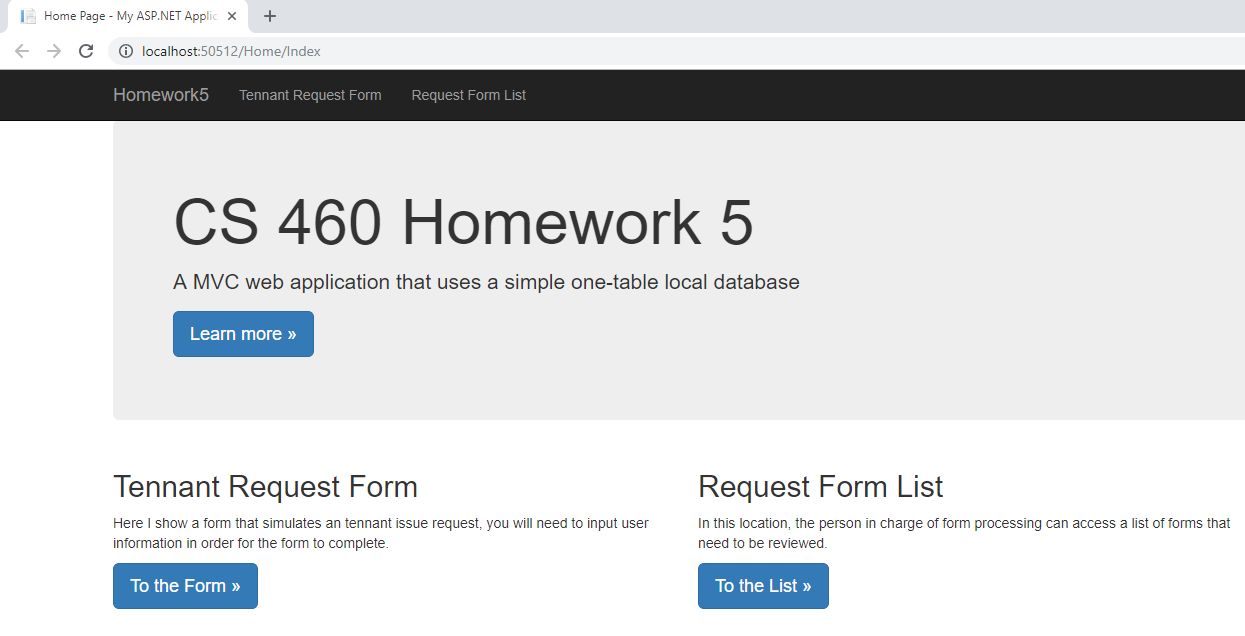
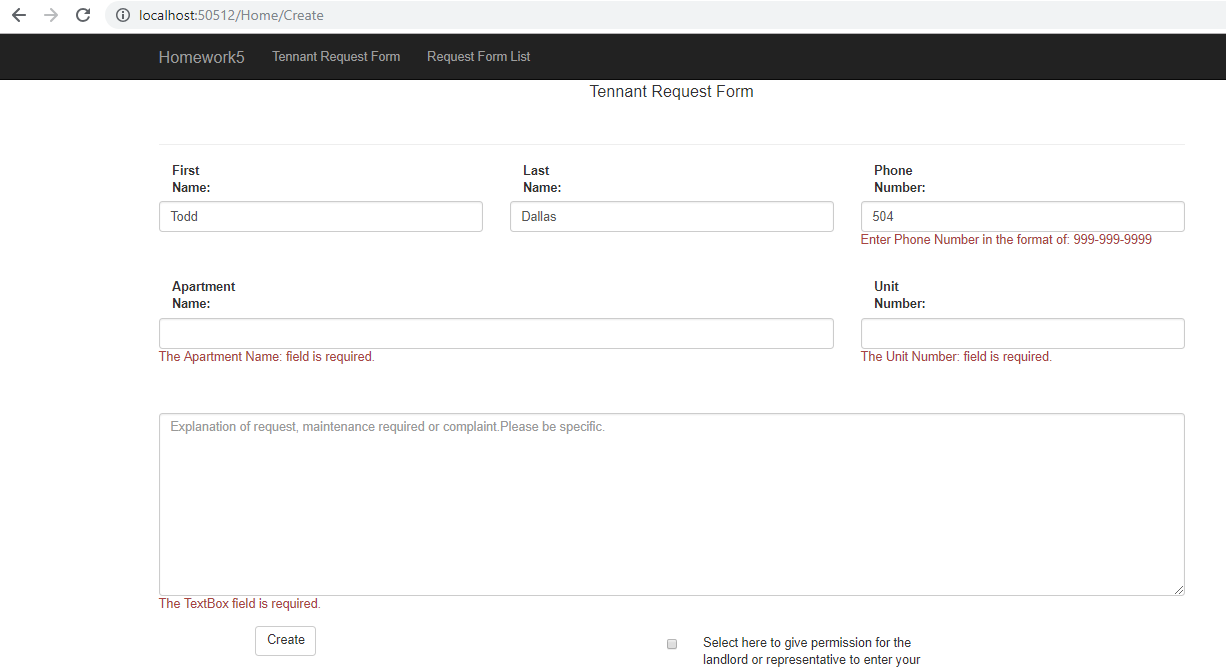
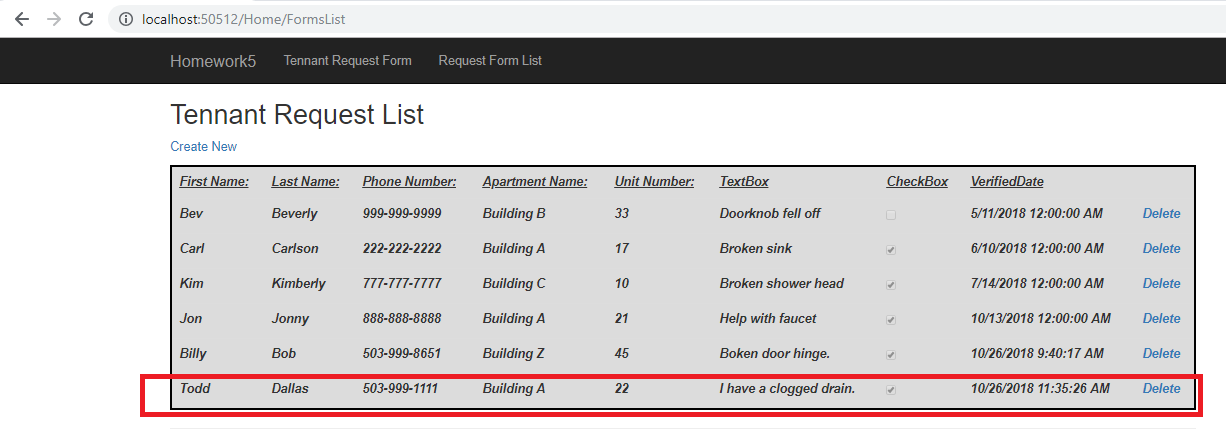
All that was left was to confirm that the site was working as expected. See below for steps on how my form and formlist work in a series of picture steps below:
Example Homepage (I click on the “To the Form” button):

Example Incomplete Form-User is provided a new GET request view with partial information completed (I click on the “Create” button):

Example Completed Form-User fills in all information (I click on “Create”, the Post request redirects me to a GET request for Formslist):

Example Delete Page Form-User Clicks on Delete a next to a form (I click delete the top Entry for Bev Beverly and am sent to a delete confirmation view):

Example Confirmed Deleted-User Clicks on Delete (I click delete at the bottom, I am redirected to a GET view with an updated FormsList-Bev Beverly has been removed):
